Christian Ichthus
Ichthus Fish
Christianity Oasis has provided you with this free Christian Ichthus Fish Symbol pattern and free Ichthus meaning tutorial. This Christian Ichthus pattern is a fun project for all ages.
Proverbs 31:13
She seeketh wool, and flax, and worketh willingly with her hands.
Welcome to Christianity Oasis Crafts projects, part of our scripture based Virtuous Woman program, which is an amazing adventure for every woman.
Christian Ichthus Fish Patterns
What Is The Christian Ichthus Meaning
This is our absolutely free and absolutely adorable Christian Ichthus Fish Bookmark craft idea. In addition, you could choose to create a lovely and YOU-nique Christian Ichthus Fish Bracelet with a step by step tutorial which has easy to follow instructions with images on how to make a Christian Ichthus Bookmark and/or Ichthus Bracelet.
Ichthus Bookmark
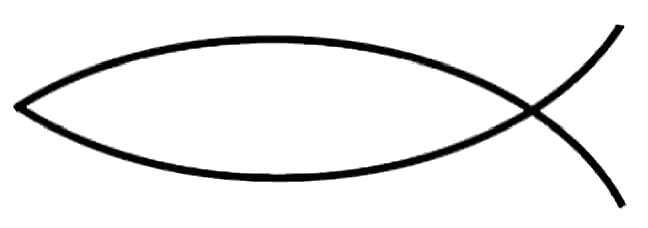
Christian Ichthus (also Ichthus or Ichthys) is the Greek word for fish. It is also called the Jesus Fish
by many who come across it. Usually on bumper stickers to Church signs to clothing to jewelry. The mysterious looking Christian Ichthus inscription is: ΙΧΘΥΣ ... Each of the five letters being the first letter in Greek for the message. This (generally speaking) in Greek stands for ... Jesus - Anointed - God's - Son - Savior.
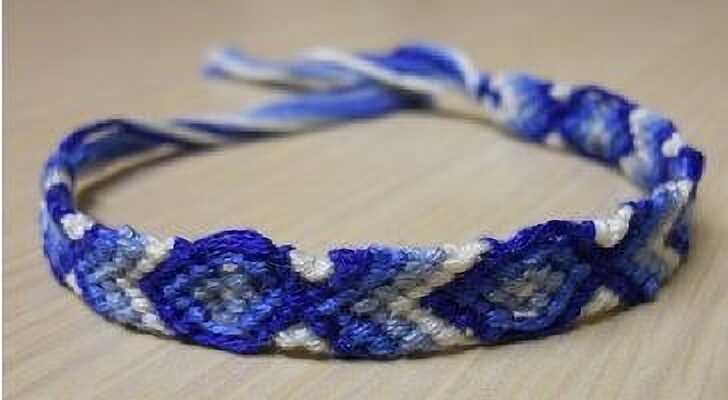
This Ichthus Fish Bookmark pattern can also be used as a Christian Friendship Bracelet. It measures approximately 6 inches long from knot to knot and approximately 10 inches long with the tails.
Please read all of the Christian Ichthus instructions in their entirety before beginning the Ichthus Bookmark Project.
Materials you will need:
- Embroidery Floss - 4 colors
- Safety Pin
- Scissors
Note: Embroidery floss comes in skeins with 6 individual strands of floss twisted together. For this project the term "strand" will refer to all six strands together as it comes off the skein. Do not separate the individual strands from one another.
If each of your strands is 1¼ yards or 45 inches long, you will be able to make a bookmark with tassels on each end that are 2 to 2½ inches long with 5 Ichthus in between. Add 8 inches to each strand for each extra Ichthus you may want to add to the length of your Christian Ichthus bookmark. A skein of embroidery floss contains approximately 8½ yards, so one skein of embroidery floss will be plenty for your Ichthus fish bookmark.
To get an idea of what your finished Ichthus bookmark will look like, you may want to sketch a rough picture with colored pencils, crayons or markers using the colors you plan to use. The Ichthus will stand out most if you use the lightest color as A1 and A2 and the darkest color as D1 and D2. This will make more sense, once you see Diagram a below.
Note: In the Christian Ichthus Fish design instructions below, you will see an R in parenthesis like this: (R) This indicates a double knot worked in reverse. The diagrams are very helpful in showing how to work a reverse double knot. It is very important that your knots are worked in the proper direction.
Step 1 - Diagram a
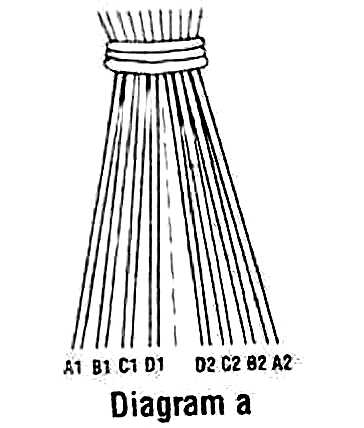
Tie all strands together in a knot leaving a 2 to 2½ inch tail. Secure to a surface (the arm of a fabric recliner for example) using a safety pin.
The Christian Ichthus Fish bookmark is made with 8 strands of embroidery floss. You'll use 2 strands each of 4 colors (A, B, C, D) arranged as follows:
A1, B1, C1, D1, D2, C2, B2, A2.
Smooth out the strands so they are in the right color order (refer to Diagram a).
Step 2 - Diagram b
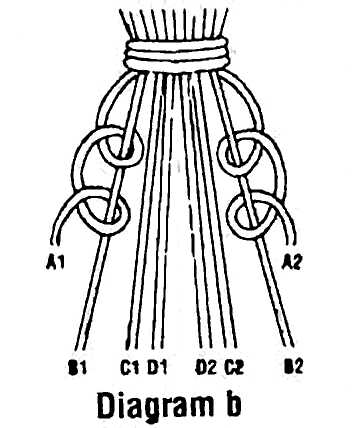
Left Side: With A1, work a double knot around B1, then around C1, then around D1.
Right Side: With A2 work a double knot (R) around B2, then around C2, then around D2.
After that, with A1, work a double knot around A2.
The first "chevron" (or ∨ shape) is completed. In the same way, make three more chevrons:
- One with B1 and B2;
- One with C1 and C2;
- One with D1 and D2.
The last chevron that you made with color D will form the tail of the "Ichthus" or fish.
Step 3 - Diagram c
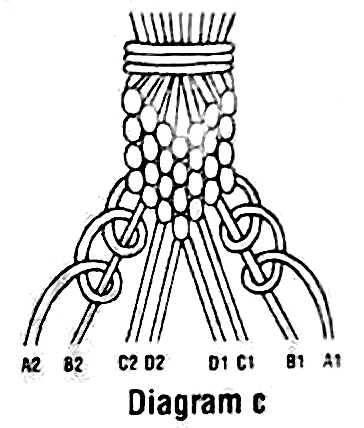
Left Side: With A2, work a double knot then a double knot (R) around B2.
Right Side: With A1, work a double knot (R) then a double knot around B1.
Step 4 - Diagram d
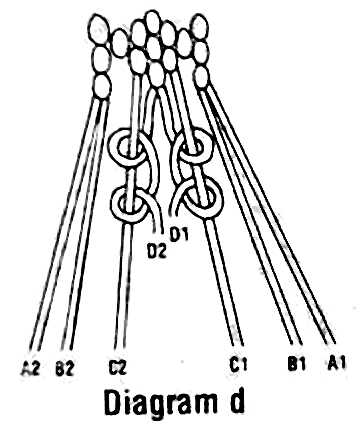
Left Side: With D2, work a double knot (R) around C2, then around B2 then around A2.
Right Side: With D1, work a double knot around C1, then around B1 then around A1.
You have started the body of the Ichthus.
Step 5 - Diagram e
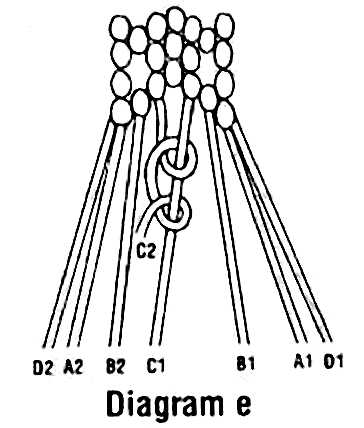
With C2, work a double knot around C1.
Left Side: With C1, work a double knot (R) around B2, then around A2.
Right Side: With C2, work a double knot around B1, then around A1.
Step 6 - Diagram f
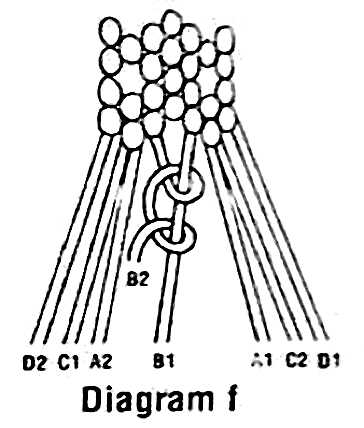
With B2, work a double knot around B1.
Left Side: With B1, work a double knot (R) around A2.
Right Side: With B2, work a double knot around A1.
Step 7 - Diagram g
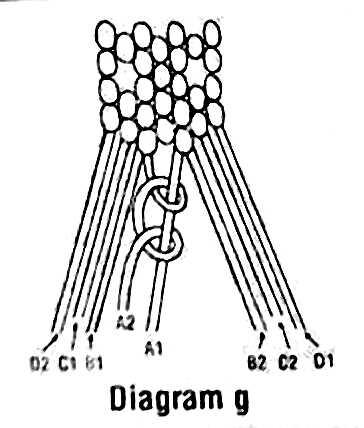
With A2, work a double knot around A1.
Step 8 - Diagram h
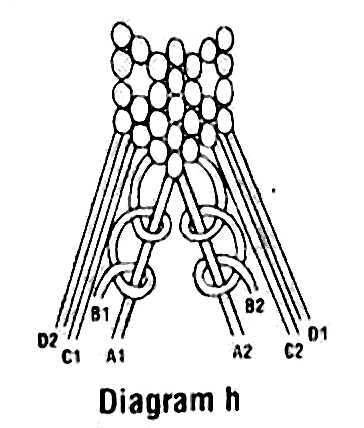
Left Side: With B1, work a double knot around A1.
Right Side: With B2, work a double knot (R) around A2, then around B1.
After that, with C1, work a double knot around B2.
Step 9 - Diagram i
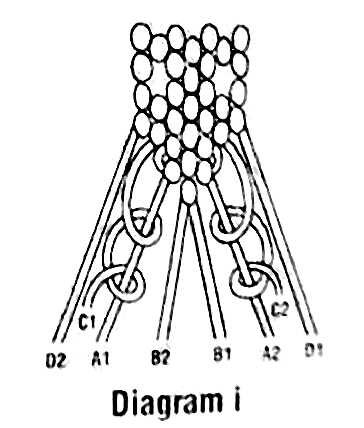
Left Side: With C1, work a double knot around A1, then around B2.
Right Side: With C2, work a double knot (R) around A2, then around B1.
After that, with C1, work a double knot around C2.
Step 10 - Diagram j
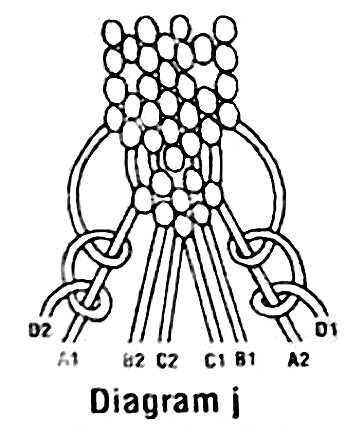
Left Side: With D2, work a double knot around A1, then around B2, then around C2.
Right Side: With D1, work a double knot (R) around A2, then around B1 then around C1.
After that, with D2, work a double knot around D1.
Step 11 - Diagram k
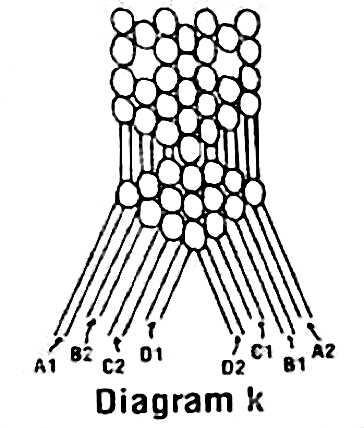
One Christian Ichthus is completed. To continue the Ichthus bookmark, repeat the design, starting with Step 2 until you have the length of bookmark you wish.
After the last Christian Ichthus, finish with three chevrons.
Tie strands in a knot as in Diagram a.
Trim tail to same length as beginning tail.
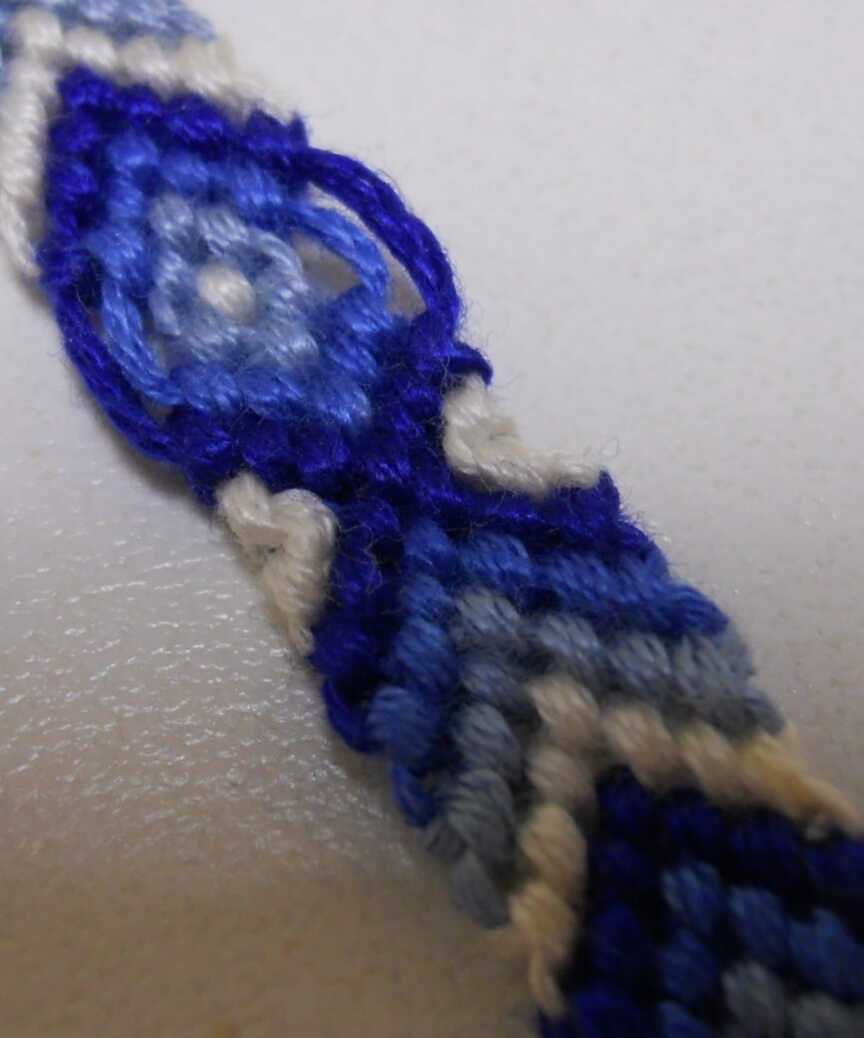
Close up of a completed Christian Ichthus Fish on the Bookmark or Bracelet
If you like this Christian Ichthus Fish Bookmark project or know someone who would, please pass on a link to this page or feel free to include a link on your website.
God Bless.
If you like this Christian Ichthus Bookmark project, you will also like our Now I Lay Me Down to Sleep Cross Stitch pattern and tutorial. Click the link below to create a lovely Cross Stitch project for yourself or a loved one:
In addition Christianity Oasis has shared other 100% free Christian project patterns, procedures and tutorials available. Thank you for visiting our Christian Ichthus Fish Bookmark tutorial.
Creative craft ideas at the link below:
Copyright © 2000-2025 All rights reserved.

Living Water at Christianity Oasis
John 7:38 He that believeth on me, as the scripture hath said,
out of his belly shall flow rivers of living water.

Learn how the Christianity Oasis Ministry was created by the Hand of the Lord. A true story of unconditional Love, Mercy and God's glorious Grace.
Excellent Christian Resources
EarlyChurchHistory.org ... The Fish Symbol—Ichthus. Tertullian calls Jesus Christ "our Ichthus." Ichthus is a Greek word meaning "fish."
Etsy ... Christian Ichthus symbol necklace, Ichthys Jesus Fish Necklace, Ancient Greek symbol, Christians fish necklace, sign of the fish pendant.
Holy Spirit ... The Holy Spirit inspired, Christian Ichthus Fish - The Ichthus Meaning is a Fish and that is why the symbol is the Word Jesus (in Greek) within a Fish. Get to know the Spiritual source of the Christian Ichthus.
Mighty Is The Lord ... The Ichthus - Online Articles ‹ Eastside Church of Christ. Apr 28, 2019 — The symbol is called an Ichthus (pronounced "ickthoose"), which is a Greek word for "fish," and is spelled by those five Greek letters.
New World Encyclopedia ... Ichthus is a Christian symbol. Symbolic meaning. An early circular ichthys symbol, created by combining the Greek letters ΙΧΘΥΣ.
Pinterest ... Christian Ichthus - Explore Tam Wyman's board "Ichthus" on Pinterest. See more ideas about Christian fish, Christian symbols, Christian tattoos.
Wikipedia ... Ichthys is now known colloquially as the "sign of the fish" or the "Jesus fish." Ichthys was adopted as a Christian symbol.
Zazzle ... Jesus Ichthus Fish Christianity Symbol Sticker. Christians in Biblical times used the fish as a secret symbol to other believers. This Ichthus sign has JESUS written inside it.
After you finish the Ichthus Meaning forum with free Ichthus pattern and free Ichthus fish tutorial made with embroidery floss, you can also check out some of the other Christian entertainment, games, music, books, mall, studies and programs within our Christian community below:


